Compass Signal
For: advanced users tuning interference and inaccuracy.
When tracking fails outright (interference) or drifts off the truth (inaccuracy), plus the anti-camping hotspot.
Signal Interference
Tracking can fail with a gray Bad signal readout when conditions are
bad. The master enabled switch defaults to on, with only the
invisible option on, so invisibility interferes out of the box
while everything else stays opt-in.
Options live in five groups under signal.interference: holder
(movement, player-stats), target (line-of-sight, invisible),
terrain (underground, underwater, altitude), climate
(light-level, weather, biome), and policy (required-to-fail,
chance-to-bypass, show-reason-in-actionbar).
Each sub-option watches one thing (all default to off except
invisible):
light-level: fails in the dark, with separate sky and block light minimums. Only applies in the overworld.interfere-whenpicks whether one unmet minimum is enough (ONE_UNMET) or both must be unmet (BOTH_UNMET, the default).underground: fails under too many solid blocks overhead. Glass, leaves, and other non-whole blocks do not count unless you turnignore-transparentoff.underwater: fails under too much water overhead, but only while the feet block itself is water. Works likeundergroundbut counts fluid blocks above the feet.altitude: fails outside a min/max height band.weather: fails during the listed weather (STORM,RAIN,CLEAR). Pick the values from the in-game checklist.biome: fails in the listed biomes, written as full keys likeminecraft:desert.movement: fails when the refresher's longest displacement during the run passesthreshold-blocks(default 0.2) from their press spot. Only fires on the analysis path, since instant refreshes have no gap to move in.line-of-sight: fails based on whether the holder can see the target. One eye-to-eye ray is checked; glass and leaves never block it.interfere-whenpicks the failing side (VISIBLEby default,NOT_VISIBLEfor the opposite), andmax-ray-distance(default 300) caps the ray: past it, there is no line of sight. Only live targets in the same world are checked.invisible: fails when a side is under the invisibility effect (on by default). Itscheck-ondefault ofBOTHmeans either side's invisibility interferes.player-stats: fails when a side's stats run low.healthfails belowmin-healthhealth points (default 8, where 20 is full vanilla health),hungerbelowmin-hungerhunger bar levels (default 10), andexperiencebelowmin-exp-levellevels (default 5). Each has its owncheck-onkey defaulting toSELF.
Every option except line-of-sight and weather has its own
check-on key: SELF checks only the holder's spot, TARGET
checks only the target's press-time spot, and BOTH checks each.
Light, movement, and the player stats default to SELF; the rest
default to BOTH. Weather is always holder-side only and has no
check-on key. Each side counts its failures against
required-to-fail (default 1), and chance-to-bypass gives a bad
signal a random chance to track anyway.
With show-reason-in-actionbar (default on), a bad signal names its
cause: :( Bad signal (underground). When several options fail at
once, the most recently found one shows; the holder side wins ties.
The names come from the compass.signal-reason messages and can be
reworded there.
Interference works best with automatic refreshes off, analysis on, and right-click refreshes on: instant refreshes leave no gap for movement, doom, or stat changes to matter.
Signal Inaccuracy
The compass can drift off the truth instead of failing outright.
Every refresh picks a random point inside a ring (a donut) around the
true spot: the ring grows with the true distance, so far targets read
fuzzier than near ones. Close range stays exact until the
thresholds.min-distance gate passes.
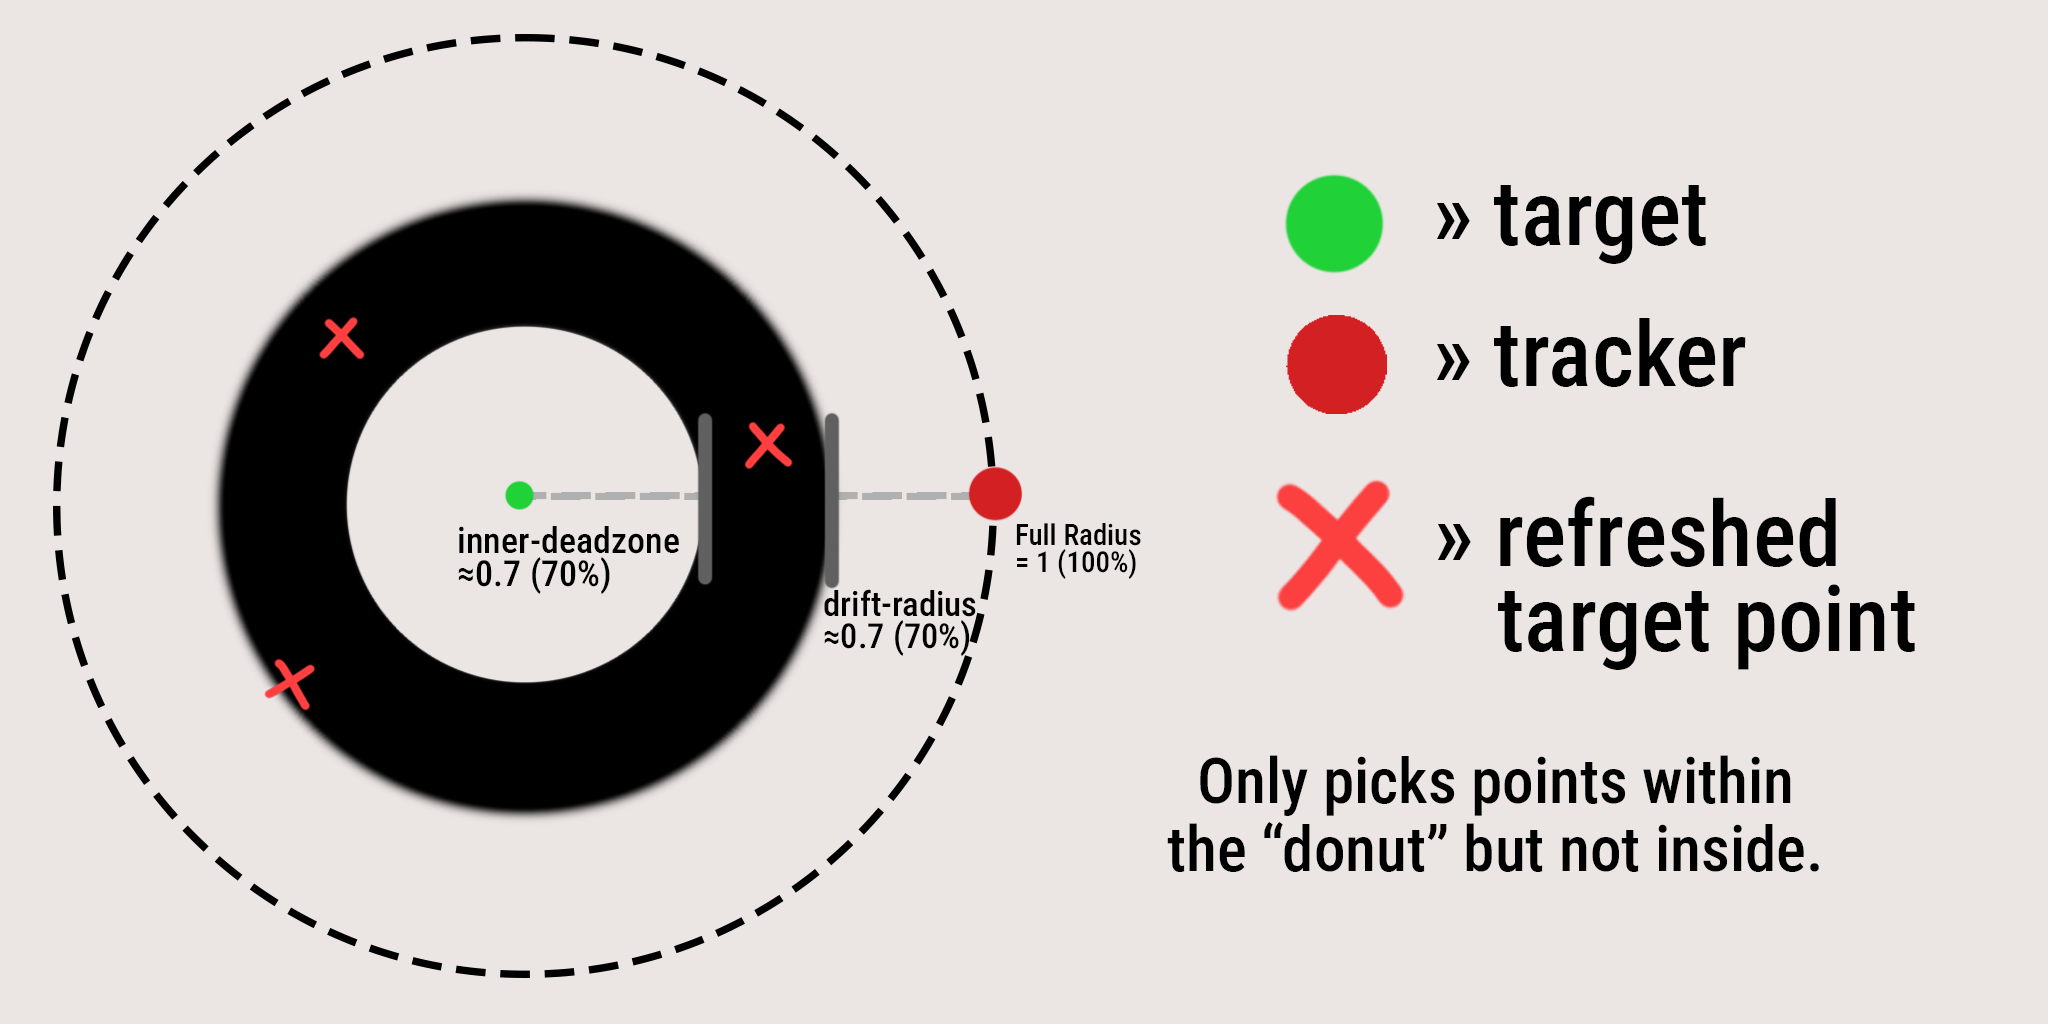
The sheet shows the defaults. The green dot is the true spot and the
red dot is the tracker at the full true distance. Each red X is one
refresh's picked point: every X lands somewhere in the black band,
never in the white hole, and never outside the band. The dashed circle
is the full true distance; drift-radius sets the band's outer edge
as a share of it, and inner-deadzone sets the white hole as a share
of that outer edge.
enabled(default on) is the master switch.modelgroups the error shape:inner-deadzone,drift-radius, andinaccurate-onbelow all live under it.inner-deadzone(default 0.6) is the hole in the middle of the donut, from 0 up to (but not including) 1. At 0.5 no sample ever lands inside half the drift radius; at 0 the sample may land right on the true spot.drift-radius(default 0.6) is how far the readout may wander, as a share of the true distance. At 1 the error reaches up to the full distance away; near 0 it hugs the truth. It clamps to 0.01 at the bottom so the error never fully vanishes while enabled.thresholds.min-distance(default 100) is the range past which the error kicks in. Set it to -1 to always apply the error. It must stay belowmax-distancewhile max is set.thresholds.max-distance(default 1000) is the range past which the error stops growing: longer true distances reuse this range for the donut. Set it to -1 for unbounded growth.inaccurate-on(default BOTH) picks what drifts: NEEDLE moves only the needle, DISTANCE_FEEDBACK moves only the shown distance, BOTH moves both.
Two guardrails keep the drift honest. The needle only drifts on a
plain compass item: any other item has no settable needle. The
distance only drifts while a distance readout is visible. Scrolled
(cache-only) targets drift exactly like refreshed ones.
Hotspot
Idling targets get easier to pin down: every sample-interval
seconds (default 10) the plugin records each live participant's spot,
keeping the last max-points spots (default 40). Players who are
offline, dead, respawning, or held for a headstart are skipped, and
nothing is recorded while a headstart countdown runs. Skipping never
erases what is already recorded. When many of a
target's saved spots sit within hotspot-radius meters (default 70)
of where they stand now, the error donut shrinks (the black band in
the sheet above narrows). Movers keep the full error.
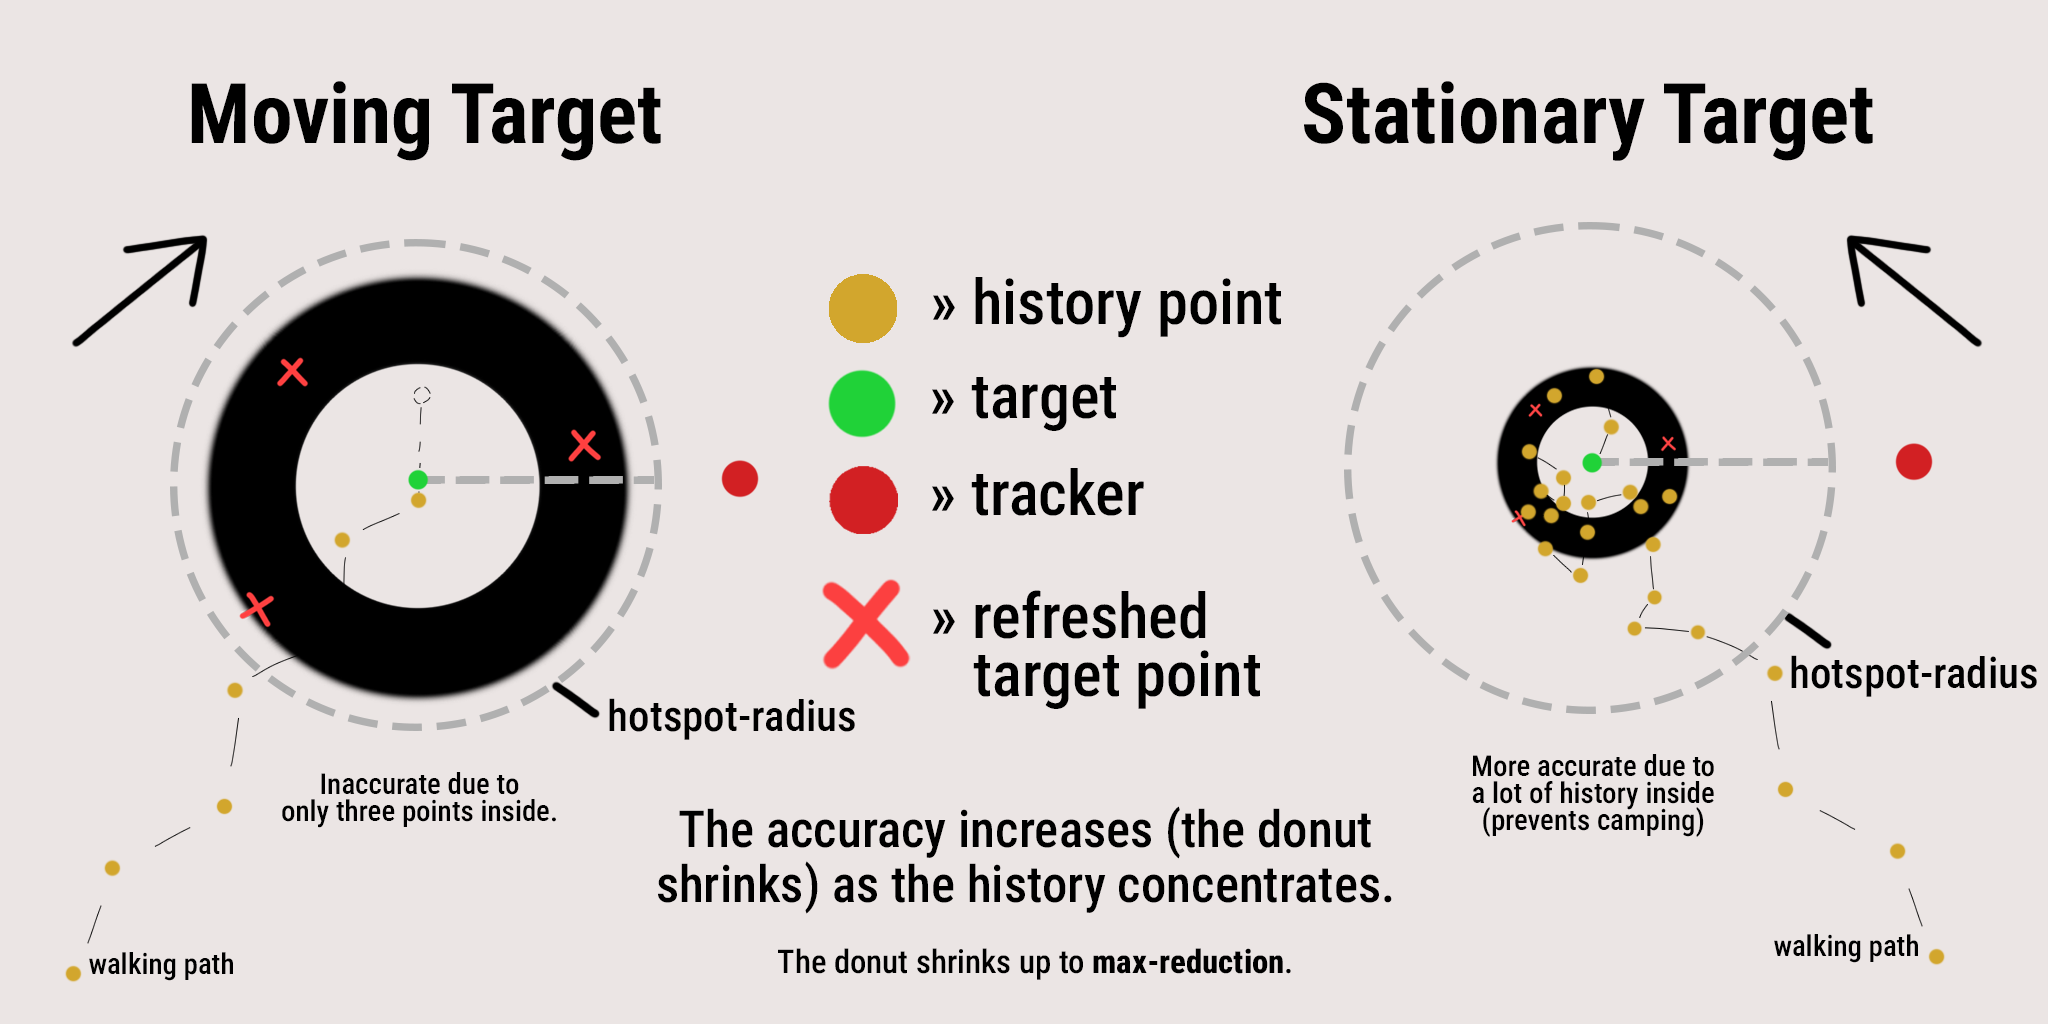
The sheet compares both cases. The gold dots are the target's recorded
history along their walking path, and the dashed circle is
hotspot-radius around where they stand now. On the left the mover
has only three dots inside, which earns only partial credit, so the
donut stays wide. On the right the camper's history piles up inside
and the donut collapses. That is the anti-camping effect: idlers get
pinpointed while movers keep their cover.
full-accuracy-fraction (default 0.5) is the share of max-points
needed inside the radius for the full bonus, with partial credit
below that. max-reduction (default 0.9) is how much error the full
bonus removes. Saved spots disappear only when their player is
knocked out of the match for good, or when the match ends. Leaving
on your own, a short disconnect, a respawn, or losing a compass
keeps them.